How to Make Your Own Dog Food Kibble
- Houndsy
Table of Contents
- Introduction
- Why Consider Homemade Kibble?
- Essential Ingredients for a Balanced Batch
- The Step-by-Step Kibble Baking Process
- Managing Your New Feeding Routine
- The Design of the Feeding Area
- Common Mistakes to Avoid
- Is Homemade Kibble Right for You?
- Creating a Sustainable Habit
- Conclusion
- FAQ
Introduction
You stand in the pet food aisle, squinting at a label filled with words you cannot pronounce. We have all been there. You want the best for your dog, but sometimes the "premium" bag in your hand feels like a mystery of processed byproducts and fillers. You might wonder if there is a way to give your dog the freshness of a home-cooked meal with the convenience of dry food.
At Houndsy, we believe that the feeding ritual should be the highlight of your dog's day—and yours, too. That is why we are exploring the process of creating your own dry food from scratch, and why the Houndsy Kibble Dispenser fits naturally into a routine built around consistency. In this guide, we will walk you through the ingredients, the baking process, and the storage tips you need to succeed. Transitioning to a homemade diet allows you to control every single nutrient that goes into your dog's bowl.
Making your own kibble is a commitment to your pet’s long-term health and your own peace of mind. By the end of this article, you will have a clear, step-by-step plan to create a nutritious, crunchy, and shelf-stable meal for your furry companion.
Why Consider Homemade Kibble?
Many dog owners turn to homemade meals because of persistent health issues. Perhaps your dog has itchy skin that never seems to clear up, or a sensitive stomach that reacts to commercial preservatives. When you make your own food, you eliminate the "hidden" ingredients that often trigger these sensitivities.
Customization is the biggest advantage. You can choose locally sourced meats and organic vegetables that fit your dog's specific taste and health requirements. Beyond health, there is a certain satisfaction in knowing exactly what is in the bin. You aren't just pouring out processed pellets; you are serving a meal you prepared with care, much like the approach in our Can I Make Homemade Dog Food?.
Key Takeaway: Homemade kibble provides total transparency and allows you to tailor nutrition to your dog’s specific allergies or preferences.
Essential Ingredients for a Balanced Batch
Before you preheat the oven, you need a plan. A dog's nutritional needs are different from a human's. They require a specific balance of protein, fats, and carbohydrates to thrive. Most veterinarians recommend a ratio that leans heavily on high-quality protein.
High-Quality Proteins
Protein is the foundation of any good kibble. Ground turkey and lean beef are popular choices because they are easy to cook and generally well-tolerated. Some owners prefer chicken or even pork, provided it is lean and free of added seasonings or salts. If your dog has kidney concerns, you might lean toward proteins lower in phosphorus, like lean ground sirloin.
Healthy Carbohydrates and Fiber
Carbs provide the energy your dog needs for those long walks and games of fetch. Brown rice is a staple in homemade recipes because it retains the fiber from the hull and is easy on the digestive tract. Lentils, sweet potatoes, and oats are also excellent additions. These ingredients help the kibble hold its shape during the baking process, giving it that satisfying crunch.
Fruits and Vegetables
Vegetables add essential vitamins and minerals. Carrots, peas, spinach, and blueberries are common favorites. Some owners find that pureeing these vegetables before mixing them into the dough ensures the dog gets all the nutrients without picking out the "green bits."
Healthy Fats and Herbs
A splash of olive oil or sunflower oil can improve your dog's coat and skin. You can also add fresh herbs like parsley or rosemary. Parsley is excellent for freshening breath and supporting kidney health, while rosemary acts as a natural preservative to help the kibble last longer.
| Ingredient Category | Recommended Options | Purpose |
|---|---|---|
| Protein | Turkey, Beef, Chicken, Lamb | Muscle maintenance and energy |
| Grains/Carbs | Brown Rice, Oats, Lentils | Fiber and "crunch" texture |
| Vegetables | Carrots, Sweet Potato, Spinach | Vitamins and minerals |
| Fats | Olive Oil, Safflower Oil | Skin and coat health |
| Herbs | Parsley, Rosemary | Fresh breath and preservation |
The Step-by-Step Kibble Baking Process
Making kibble is essentially making a giant, nutrient-dense cracker and then breaking it into bite-sized pieces. The key is removing enough moisture so the food stays crunchy and resists mold.
Step 1: Cook the Grains and Legumes
Start by boiling your rice and lentils. You want them to be soft enough to blend easily. Use roughly two parts water to one part grain. Once cooked, let them cool slightly. This forms the "dough" base that will bind the meat and vegetables together.
Step 2: Prepare the Protein and Veggies
Brown your ground meat in a skillet. You do not need to add oil yet, as the meat will release its own fats. While the meat cooks, chop your vegetables into very small pieces or pulse them in a food processor. Small pieces ensure even baking and better digestion.
Step 3: Create the Puree
Combine the cooked grains, meat, vegetables, and oil in a large bowl. For a consistent kibble texture, many owners run this mixture through a food processor until it resembles a thick, spreadable paste. If the mixture feels too dry, add a small amount of water or low-sodium bone broth.
Step 4: The Initial Bake
Preheat your oven to 350°F. Line a large baking sheet with parchment paper. Spread the mixture across the sheet until it is about 1/4 inch thick. Use a spatula to make it as level as possible. Bake for about 45 minutes. The goal here is to cook the mixture through until it feels firm to the touch.
Step 5: The Drying Phase
Lower the oven temperature to 300°F or even 250°F. Remove the tray and use a pizza cutter or knife to slice the sheet into small squares. Flip the pieces over. This is the most important part of the process. You are now dehydrating the food. Bake for another 60 to 90 minutes.
Step 6: Cooling and Testing
Turn off the oven and let the kibble sit inside as it cools. This extra time helps pull out the last bit of moisture. Once completely cool, the kibble should feel hard and dry. If it feels spongy, it needs more time in the oven. Moisture is the enemy of shelf-life.
Key Takeaway: The "low and slow" drying phase is what transforms a soft meal into a shelf-stable kibble. Do not rush the final hour of baking.
Managing Your New Feeding Routine
Transitioning to homemade kibble requires a bit of math and a lot of consistency. Since homemade food does not have the same concentrated calorie density as some commercial brands, you may need to adjust your portion sizes.
Calculating Portions
A general rule of thumb is to feed about one cup of prepared food for every ten pounds of body weight, but this varies wildly based on activity level and age. We recommend monitoring your dog's weight closely during the first month. If they seem sluggish or lose weight, increase the portion. If they start putting on extra padding, dial it back.
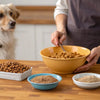
Consistency is where many owners struggle, but it is the most important factor in digestive health. Using a reliable system helps. The Houndsy Kibble Dispenser provides perfect portion control with every crank of the handle. Instead of guessing with a plastic scoop, you get the exact same amount every time. This consistency helps prevent the stomach upset that often comes with accidental overfeeding.
Storing Your Homemade Kibble
Because your homemade kibble lacks artificial preservatives, it will not last for six months in a bag like store-bought brands. You should treat it like "fresh-dry" food.
- Room Temperature: 3 to 5 days in a sealed container.
- Refrigerator: Up to 10 days.
- Freezer: Up to 3 months.
Many owners bake a large batch once a week. To keep it fresh, our kibble dispenser features a BPA-free liner that helps maintain that "just-baked" crunch. The 25–30 lb capacity means you can store a significant amount of your homemade creation without worrying about it going stale on the counter.
The Design of the Feeding Area
If you are going to the effort of making high-quality food, you shouldn't have to hide it in a utility closet. Most pet products are designed as an afterthought, often featuring bright plastics or clunky shapes that clash with a modern home. We believe your dog's feeding station should be a part of your decor, not an eyesore you trip over in the kitchen.
A well-designed feeding area simplifies your life. When your storage and dispensing system is beautiful, you are more likely to keep it in a convenient location. This makes the "standing-height" experience of our dispenser even better—you simply walk up, turn the crank, and the meal is served. No bending down, no digging through a dusty bag, and no mess on your floor.
Bottom line: A beautiful, functional feeding station turns a daily chore into a seamless part of your home routine.
Common Mistakes to Avoid
While making your own kibble is rewarding, there are a few pitfalls that can derail your progress.
Not enough calcium: In the wild, dogs get calcium from bones. In a homemade diet, you may need to add crushed eggshells or a vet-approved calcium supplement to support bone health. If you want a deeper look at balancing a homemade diet, our Does Homemade Dog Food Need Supplements? guide is a useful next step.
Using toxic ingredients: This seems obvious, but some "healthy" human foods are dangerous for dogs. Never include onions, garlic, grapes, raisins, or macadamia nuts in your kibble.
Incomplete drying: If the center of the kibble is still soft, it will mold within days. If you are unsure, err on the side of a longer, lower bake.
Myth: Free-feeding (leaving food out all day) is fine if the food is homemade. Fact: Scheduled feeding is always better. It allows you to monitor exactly how much your dog is eating and helps maintain a healthy metabolism.
Is Homemade Kibble Right for You?
Making your own food takes time. It requires prep work, baking time, and a bit of cleanup. However, for many, the benefits far outweigh the effort. You gain the peace of mind that comes from knowing your dog is eating human-grade ingredients. You also get to see the physical results: a shinier coat, better breath, and more energy.
If you are a busy dog owner, you can make this sustainable by batch-cooking. Dedicate one Sunday afternoon to "kibble prep." While the food dries in the oven for two hours, you can go about your day. Once it is done, you have a week or more of premium food ready to go.
Creating a Sustainable Habit
The key to success is not perfection, but consistency. Your dog thrives on routine. Feeding at the same time every day helps regulate their digestion and manage their behavior. When you pair high-quality homemade food with an elevated feeding experience, you are doing more than just giving them fuel; you are caring for their total well-being.
You can read more about that philosophy on About Houndsy. We created the Houndsy Kibble Dispenser to bridge the gap between the "utility" of feeding and the beauty of a well-kept home. It is built to last, with a mid-century modern aesthetic that looks stunning in any kitchen. Plus, the auto-locking mechanism ensures that even the most "food-motivated" dogs (or curious toddlers) cannot help themselves to extra portions.
Conclusion
Making your own dog food kibble is a wonderful way to invest in your pet's health. It gives you complete control over ingredients, eliminates harmful additives, and can help resolve long-standing health issues like allergies or digestive sensitivities. By following a simple process of cooking, pureeing, and slow-drying, you can create a meal that is both nutritious and convenient.
Remember these key steps:
- Consult your vet to ensure your recipe meets your dog's specific needs.
- Use high-quality proteins and fiber-rich carbohydrates.
- Focus on the "drying phase" to ensure a long shelf-life.
- Store your food in a way that maintains freshness and fits your home's aesthetic.
We invite you to elevate your feeding routine further. Our products are designed to make every mealtime a pleasure for both you and your dog. With our 30-day risk-free guarantee, there has never been a better time to rethink how you feed your best friend.
FAQ
How long does homemade kibble stay fresh?
Homemade kibble typically lasts about 10 days in the refrigerator or 3 to 5 days at room temperature in an airtight container. For a deeper look at freshness and storage, see our How Long Does Kibble Last? guide. Because it lacks artificial preservatives, it is best to store it in a cool, dry place and freeze any portions you do not plan to use within a week.
Can I mix homemade kibble with store-bought food?
Yes, many owners use a "half-and-half" approach to save time or to ease their dog into a new diet. When mixing, ensure you are still calculating the total caloric intake correctly to avoid overfeeding.
Does homemade kibble need vitamins or supplements?
While a balanced mix of meat, grains, and vegetables provides many nutrients, some dogs may need additional calcium or specific vitamins. It is always best to discuss your specific recipe with a veterinarian to ensure it is nutritionally complete for your dog's age and breed.
How do I make sure the kibble is crunchy and not soft?
The secret is a low-temperature "drying" phase in the oven. After the initial bake, cut the food into small pieces and bake them at 250°F for an hour or more until they are fully dehydrated. Leaving them in the oven as it cools also helps remove any lingering moisture. If you'd like more tips on serving dry food well, see our How to Serve Dry Dog Food.